[譯] React Hooks With Typescript
React Hooks with Typescript: Use State and Use Effect in 2020.
在這篇文章中,我們將會看到 Functional Component 透過 React Hooks,來實現 Class Component 的所有功能,並且減少程式碼的數量。
這個教學我們會透過 TypeScript,讓我們的程式碼保持百分之百的類型安全,並且我必須要說,如果你正在做一個大專案,TypeScript 是一個必須具備的功能,它有助於保持程式碼的簡潔。
透過 CRA 創造一個專案,並啟動。
npx create-react-app codersera-hooks-tutorial --template typescript
  # or
yarn create react-app codersera-hooks-tutorial --template typescript
上面的程式碼透過 CRA 創造一個名為 codersera-hooks-tutorial 的專案,完成後,進入目錄執行 npm start 或 yarn start 來啟動專案。
我們在這個教學中,將使用 yarn 來保持一致性。
現在我們將整合 antd ( 一個名為 Ant Design 的 UI 套件 ),我們將使用它一些標準的 UI 組件,而且一般來說不需要對 Hooks 或 React 進行其它設定。
將 antd 加入相依套件。
yarn add antd
載入 antd 的樣式檔
// src/index.tsx

import 'antd/dist/antd.css'
就這樣,我們完成了 TypeScript 的設定,並且整合了 react 及 antd。
使用 React Hooks 來管理組件狀態 ( React.useState )
讓我們看看如何在 hooks 中管理狀態,為此,我們創造一個簡單的表單組件,該組建在提交表單時會把當前的 value 顯示在 input 欄位。
- 創造一個
StateHooksComponent.tsx檔案位於src/components目錄中。 - 然後創造一個
App.tsx並導入StateHooksComponent。
// src/components/StateHooksComponent.tsx

import React from 'react'
interface Props {}

const StateHooksComponent: React.FC<Props> = ({}) => {
    return <div>State Hooks component</div>
}

export default StateHooksComponent
然後 App.tsx 將如下所示:
import React from 'react'
import './App.css'
import StateHooksComponent from './components/StateHooksComponent'

const App: React.FC = () => {
    return (
        <div className="App">
            <StateHooksComponent />
        </div>
    )
}

export default App
現在,我們在 StateHooksComponent 裡添加按鈕,輸入的欄位跟顯示的欄位。
const [name, setName] = useState<string>('')
useState 將回傳兩個值,第一個是狀態的值,第二個是改變狀態的方法。我們可以用任何的方式來命名,不過顯而已見的是以下的使用方式:
[xxx, setXxx]
該處理程式宣告為箭頭函式,舉例來說,有兩個處理程式 handleSubmit、onChangeEvent。
const handleSubmit = (e: FormEvent<HTMLFormElement>) => {
    e.preventDefault()
}

const onNameChange = (e: ChangeEvent<HTMLInputElement>) => {
    setName(e.target.value)
}
經過如下的編輯後,你的組件將如下所示:
import React, { ChangeEvent, FormEvent, useState } from 'react'
import { Form, Input, Button } from 'antd'

interface Props {}

const StateHooksComponent: React.FC<Props> = ({}) => {
    const [name, setName] = useState<string>('')

    const handleSubmit = (e: FormEvent<HTMLFormElement>) => {
        e.preventDefault()
        console.log(name)
    }

    const onNameChange = (e: ChangeEvent<HTMLInputElement>) => {
        setName(e.target.value)
    }

    return (
        <Form layout="inline" onSubmit={handleSubmit}>
            <Form.Item>
                <Input type="text" placeholder="name" value={name} onChange={onNameChange} />
                <Button htmlType="submit" type="primary">
                    Submit
                </Button>
            </Form.Item>
        </Form>
    )
}

export default StateHooksComponent
這是你在輸入框中輸入內容,並點擊送出後,預期會輸出的值。

使用 React.useEffect
useEffect 基本上提供了 componentWillUpdate componentWillMount componentWillUnMount 所有的功能。
useEffect(() => {
    console.log('Component mounted')
    return () => {
        console.log('Component will be unmount')
    }
}, []) // notice the empty array here, this is optional
現在,上面的程式碼是 useEffect 的範例,請注意上面的空陣列,useEffect 有三種使用方式。
- 如果第二個參數為空陣列,則該 effect 函式將在組件 mounting 時執行一次,而 return 的函式將在 unmounting 時執行,舉例來說,這可用在顯示組件的同時,call API 取得組件需要的資料。
- 如果未提供第二個參數,則該函式每一次渲染之後都會執行,可以用記錄渲染執行的次數。
- 如果陣列中有定義任何狀態參數,則在 mounting 時會執行一次 effects 函式,然後每次陣列中的狀態參數異動時都會再次執行 effects 函式,有個非常好用的範例是,當你在輸入框要顯示建議項目時,當使用者輸入內容時,你要根據輸入內容向其顯示建議的項目,那麼你可以將 input value 設為狀態參數,讓每次狀態參數改變時,都執行 effect 函式向後端取得資料。
const [name, setName] = useState<string>('')
const [options, setOptions] = useState<Array<string>>([])
useEffect(() => {
    if (name) {
        // fetch auto suggest options from backend,
        setOptions(data)
    }
}, [name])
現在,每次使用者在輸入框輸入文字後,name 會被設為該文字,而每次 name 改變後,都會從 server 取得建議的數據並且將該數據設為 options,然後就能用 options 來顯示自動建議的項目,下面的程式碼顯示如何使用 effect 來完成這個效果:
import React, { ChangeEvent, FormEvent, useState, useEffect } from 'react'
import { Form, Input, Button } from 'antd'

interface Props {}

const StateHooksComponent: React.FC<Props> = ({}) => {
    const [name, setName] = useState<string>('')
    const [address, setAddress] = useState<string>('')

    const handleSubmit = (e: FormEvent<HTMLFormElement>) => {
        e.preventDefault()
        console.log(name)
    }

    const onNameChange = (e: ChangeEvent<HTMLInputElement>) => {
        setName(e.target.value)
    }

    const onAddressChange = (e: ChangeEvent<HTMLInputElement>) => {
        setAddress(e.target.value)
    }

    useEffect(() => {
        console.log('Component mounted')
        return () => {
            console.log('Component will be unmount')
        }
    }, [])

    useEffect(() => {
        console.log(`Any state changed Name: ${name}, Address: ${address}`)
    })

    useEffect(() => {
        console.log(`Name changed: ${name}`)
    }, [name])

    return (
        <Form layout="inline" onSubmit={handleSubmit}>
            <Form.Item>
                <Input type="text" placeholder="name" value={name} onChange={onNameChange} />
                <Input type="text" placeholder="address" value={address} onChange={onAddressChange} />
                <Button htmlType="submit" type="primary">
                    {' '}
                    Submit{' '}
                </Button>
            </Form.Item>
        </Form>
    )
}

export default StateHooksComponent
_ 注意:不要在第二個 useEffect 中改變狀態,也不要在第三個 useEffect 中改變 name,否則會變成無限迴圈。 _
上面的程式碼會輸出:
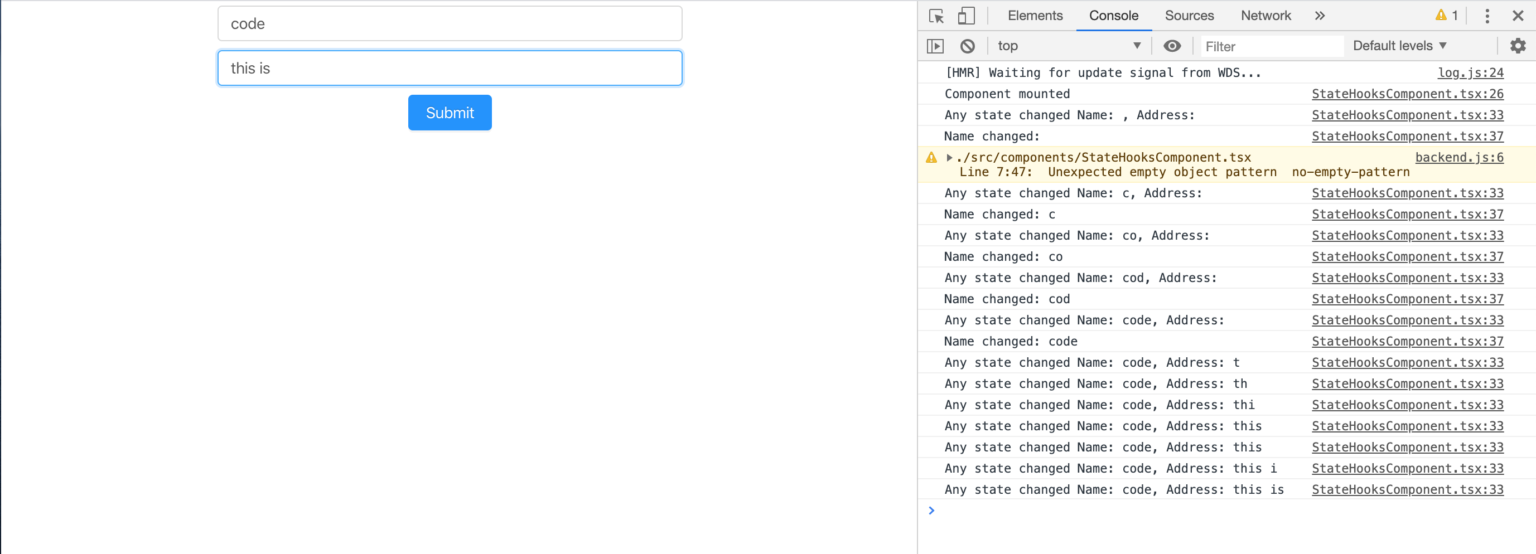
所以,這就是如何使用 Functional Component 來實現 Class Component 生命週期的方法。
Subscribe to TYSON Tech Blog
Get the latest posts delivered right to your inbox